Author Topic: Ham Brining 101  (Read 34608 times)

0 Members and 1 Guest are viewing this topic.

Offline TentHunteR

  • Global Moderator
  • Hero Member
  • *****
  • Posts: 6687
  • N.E. Ohio
Ham Brining 101
« Reply #-1 on: December 19, 2013, 09:20:06 PM »


This brining process can be used to make Bacon, Canadian Bacon and Corned Beef, as well as Ham!


Table of Contents

Section 1: Why Brine & What do I need?
Section 2: What's in a Brine - FAQ's about Salt, Sugar & Nitrite Levels
Section 3: Brine & Meat Preparation
Section 4: Injecting & Curing the Ham
Section 5: Smoking & Glazing the Ham


Special Thanks go to my friend Dr. Kevin Galat who has a PhD in chemistry and has done work in the field of microbiology. He is a great source of info.

« Last Edit: April 03, 2015, 03:30:31 PM by TentHunteR »
<><
2017 MAK 1 Star General with FlameZone
Former Owner: MAK 1 Star General - 2014 & 2011 Models
Weber Performer with Stoven Pellet Grill Adapter
Modified Horizontal Offset Smoker
1986 Weber One-Touch Silver (a few dings, but still works)
Member #68

Offline TentHunteR

  • Global Moderator
  • Hero Member
  • *****
  • Posts: 6687
  • N.E. Ohio
Re: Ham Brining 101
« on: December 19, 2013, 09:20:28 PM »
Section 1: Why Brine & What do I need?

► Curing Methods
Curing is a way of preserving meat and gives it that classic cured flavor and pink color we associate with Ham, Bacon, smoked sausage, etc.

Artisan hams, such as Parma & Smithfield, are salted & dry-cured for months, or even years in very strict conditions.  Mass-produced hams are machine-injected with a quick-curing brine, and baked in large smoker-ovens. They are rushed and average quality at best.

Brining offers a relatively quick and easy way to make a quality ham at home, and requires very little equipment. Even a few days in the brine improves the "hammy quality" of the flavor and texture!

Two brining methods: We'll use the Pump & Immerse method.


► What's Needed:

Some basic equipment,
A fresh cut of Pork (preferably a leg cut),
Brine Recipe/Ingredients: Water, Salt, Sugar & Curing Salt #1.


Equipment: Chances are you already have these items:
  • A syringe type meat injector,
  • A thermometer - to check/monitor the Ham's internal temperature.
  • A food-safe, lidded container, or brining bag big enough to hold your ham and between 1½  - 3 gallons of brine. Keep in mind, it will need to fit in your refrigerator.
  • A Grill/Smoker


► Which cut of pork to use:

Recommended Fresh Cuts:
Fresh Ham cuts can be purchased as whole, or half cuts. You may need to seek out a butcher to find them.
  • Whole Ham (often labeled as "Pork Leg) 15 - 26 lbs.
  • Ham Butt End 8- 13 lbs
  • Ham Shank End 8- 13 lbs
  • Picnic Ham (Shoulder) 7 to 11 lbs.


Picnic Hams are a great option, especially if you have trouble finding an actual Fresh Ham cut.  They're
easier to find, economical, and easy to handle, making them ideal for the average do-it-yourself-er.
I tend to use Picnic Hams more often than actual ham cuts.

Picnic Hams look just like a Ham Shank Half when done


Other Options:
  • Boston Butt (boneless) - Can be used for: Boneless style ham, or Buckboard Bacon (butterfly into two thinner sections).
  • Pork Loin (boneless) - Can be used for: Canadian Bacon, Peameal Bacon, or Kasseler Ham (Germany). It's an easy-to-slice ham for sandwich meat.
  • Pork Sirloin Roast - would make a great cut to cure into a small ham.
Make sure it's Fresh!
Whichever cut you choose, be sure it is labeled "Fresh," meaning a cut that's NOT been cooked or cured. Avoid cuts labeled "Enhanced with a solution..."
« Last Edit: February 16, 2015, 11:39:49 AM by TentHunteR »
<><
2017 MAK 1 Star General with FlameZone
Former Owner: MAK 1 Star General - 2014 & 2011 Models
Weber Performer with Stoven Pellet Grill Adapter
Modified Horizontal Offset Smoker
1986 Weber One-Touch Silver (a few dings, but still works)
Member #68

Offline TentHunteR

  • Global Moderator
  • Hero Member
  • *****
  • Posts: 6687
  • N.E. Ohio
Re: Ham Brining 101
« Reply #1 on: December 19, 2013, 09:20:53 PM »
Section 2: What's in a Brine?
FAQ's about Salt, Sugar & Nitrite Levels
Note: This section packs a lot of info and is intended for people who want to know how a brine is formulated.
If you'd rather just follow a recipe, then feel free to move on to Section 3 where I give a basic brine recipe.


So, what's in a brine?  A typical curing brine contains: Water, Salt, Sugar, Nitrite Cure, & sometimes Other Flavorings.

The three important factors are:
  • Brine Strength
  • Sugar Level
  • Nitrite Level
Once you understand these, you'll be able to customize your own brine recipes that are safe and taste the way YOU want!


► Salt Sense - Which kind of Salt should I use?
  • Non-iodized table Salt & Sea Salt: Not ideal! Contains anti-caking agents and/or impurities.
  • Kosher Salt:  Good choice - Pure & clean tasting with no additives. Varies in size, so it should be weighed and not measured.
  • Pickling salt: Best choice! - Inexpensive, made for brining, measures/weighs consistently, AND...
...it's a Kosher product - NO impurities!


► Brine Strength (Salinity) - How Much Salt should I use?

Brine strength is determined, for the most part, by how salty you like your ham.


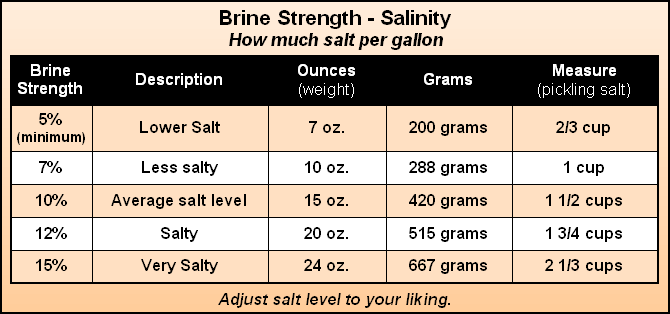
How accurate do I need to be?
Weighing is more accurate, but if you use pickling salt and measure according to the chart above, then you will be fine! A little more or less salt in the brine won't make a noticeable difference in your ham.
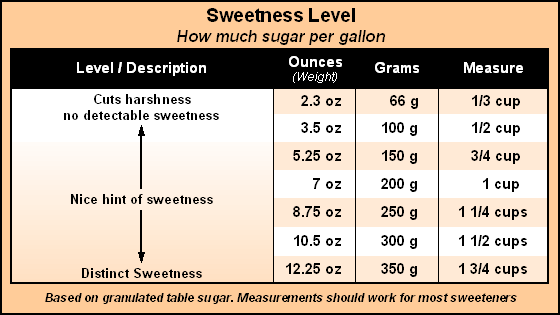


► Sugar Level (Sweetness)
Sugar cuts the harshness of salt & adds favor. It doesn't affect curing, so how much you use is purely a matter of taste & the type of ham being made. Any natural, water soluble sweetener will work:
  • Granulated Sugar - provides a non-descript sweetness.
  • Brown Sugar - Probably my overall favorite. It's cheap with a nice hint of molasses. The darker it is - the more molasses it contains.
  • Honey Self explanatory!
  • Maple Syrup Definitely not cheap! If you love Maple (like I do), then consider using regular Sugar + Maple Flavoring.
Sweeteners can vary quite a bit by weight, but FORTUNATELY most of them have similar sweetness levels when measured. The one exception is Powdered Dextrose, which is only 70% as sweet as regular sugar.

Basic guide to sweetness level & weight to measure conversion:


► Nitrite Curing Salt
Nitrite's role in curing is important. Besides preventing botulism, it helps develop the color and flavor we desire, and keeps fat from turning rancid.

Which curing salt should I use?
Cure #1 is the best choice for our purpose.

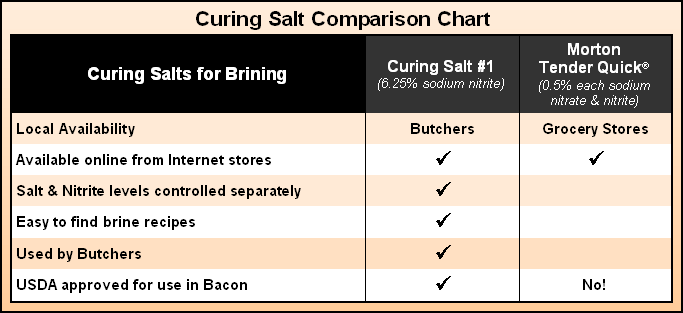
Note: Cure #1 & Tender Quick are NOT interchangeable; Do NOT use Tender Quick in recipes calling for Cure #1!

Common Brands of Cure #1: Prague Powder #1, DQ Cure #1, Insta Cure #1.
The brand is not important, so long as it contains 6.25% sodium Nitrite.

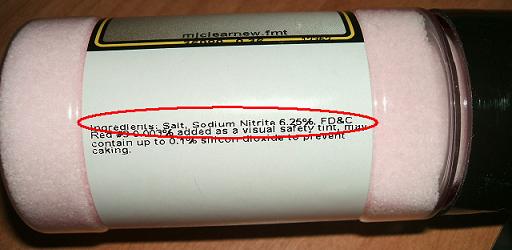
Curing salt is typically pink in color, so it's not confused it with regular salt.


► Nitrite Levels - How much Cure #1 should I use?

USDA policy requires between 120 - 200 Parts Per Million of "ingoing nitrite" for brine-cured meat.
USDA Processing Inspectors Handbook, Pg 12

So, 120 PPM is our goal, but how do we achieve that?

► First off, the popular "1 tsp per 5 lbs meat" rule CANNOT be used for brining!!!
► The Pump Rate (how much you inject, per lb of meat) determines how much nitrite you need per gallon.
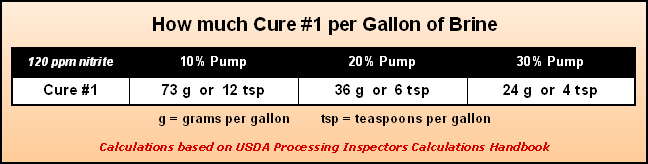
  • Pick your pump rate based on how long you want the ham to cure in the brine: 10% 6-10 days;  20% 4-7 days;  30% (max) 3-5 days (I prefer a 20% or 30% pump rate).
  • The more brine you inject, the less nitrite you need per gallon, because you're pumping more into the ham.
  • Example: a 10% pump (10% of the ham's weight) is easy to inject, but a  20% pump uses 50% less nitrite in the brine, because you're injecting twice as much.
► So, we need to calculate based on the Pump Rate...


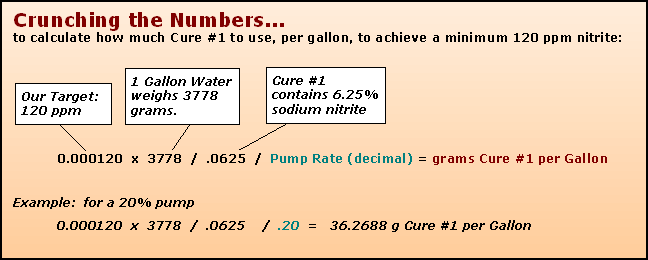
and based on that calculation we get:


Q: Does injecting more brine affect salt & sugar levels too?
A: Not really... The nitrite get's locked in, but given at least a few days, the higher salt & sugar levels in the ham will push their way out until they equalize with the rest of the brine.


► Other Flavorings
Besides sweeteners, you may want to add other flavors to your Ham. Some common flavor ingredients:
  • Pickling Spice - used for corning beef and works well with Hams too.
  • Allspice Berries - Gives a classic Holiday Ham flavor of cinnamon, clove, & nutmeg.
  • Juniper Berries, Coriander seeds, Peppercorns - German style Ham & Bacon


►Customizing Recipes
The tables above will make it easy to customize recipes to suit your needs.

Examples:
► If a recipe is too salty or sweet for your tastes, use the "Brine Strength" or "Sweetness Level" charts to adjust the levels to your liking.

► If you like a recipe, but want to inject at a 30% rate instead of 10% - in that case you would leave salt & sugar levels alone and adjust ONLY the amount of Cure #1, according to the "Cure #1 per Gallon" table.

► To build a recipe from Scratch:

1) Pick your Salt level,
2) Pick your Sugar level & Sweetener,
3) Pick your pump rate (10% or 30%) & add the appropriate amount of Cure #1,
4) Add other flavorings as you like,

...and CONGRATULATIONS! You have just customized your own ham brine!
« Last Edit: February 17, 2015, 10:41:06 PM by TentHunteR »
<><
2017 MAK 1 Star General with FlameZone
Former Owner: MAK 1 Star General - 2014 & 2011 Models
Weber Performer with Stoven Pellet Grill Adapter
Modified Horizontal Offset Smoker
1986 Weber One-Touch Silver (a few dings, but still works)
Member #68

Offline TentHunteR

  • Global Moderator
  • Hero Member
  • *****
  • Posts: 6687
  • N.E. Ohio
Re: Ham Brining 101
« Reply #2 on: December 19, 2013, 09:21:41 PM »
Section 3: Brine & Meat Preparation

Once you have your brine recipe, you can begin the process of mixing the brine & curing the Ham.

Here's my basic Brown Sugar Ham Brine recipe. Feel free to use it or create your own (see section 2).

For a 20% injection:


For a 30% injection:


► How much Brine do I need?
There is no hard & fast rule. As long as the ham can be injected and then submerged with plenty of room to move, IT WILL WORK!!!

How is this possible? Equalization! The salt/sugar in the brine & ham move in & out until they reach a state of equilibrium. A ham soaked in a 5% brine will NEVER reach more than 5%, no matter how much brine is used.

Here's a rough guide to how much brine you'll need:

My normal batch is 1 1/2 gallons for a 10 lb picnic ham, or 10 - 12 lbs bacon.

Graduated mixing pails (found in paint depts.) are cheap, and make measuring water and brine easy.


► Water & Spice Prep

Water
Unfiltered tap water MUST be boiled for at least 5 minutes to kill any pathogens and remove chlorine. Allow it to cool to room temp, THEN measure and mix the brine.
IMPORTANT: DO NOT add nitrite cure until AFTER the water has cooled!

I like to use distilled or filtered water. It's cheap, there's no off tastes (chlorine, sulfur, etc.) and you don't have to boil it!


Spice Prep - Flavoring the Brine
If you're adding any spices to your brine, simmer them in a small pan of water first, then allow it to cool while the spices steep and release their flavors. When mixing the brine, add the spices & Spice-liquid making sure to count it as part of the water to be used when measuring.

The brine will be infused with the spice flavors, which go deep into the ham when you inject!


►Mixing the Brine
  • Measure the water into a non-reactive container large enough to vigorously stir without making a mess. A stainless steel stock pot works really well for this!
  • Carefully measure and add the Sugar, Salt & Nitrite Cure
  • Stir until all the salts & sugars are dissolved.
At first the brine may look cloudy with foam on top. This is normal and will clear up!


Place the brine in the refrigerator to start chilling while you prep the ham.


►Meat Prep
Before Brining can begin, there's a little meat prep that needs to be done.

Skin/Rind - If the skin is still on the ham, it should be removed or it will make injecting difficult and will affect brining & smoke absorption.

This task will require a very sharp thin bladed knife such as filet or boning knife. Start at a corner and make an incision just under the skin. Continue carefully slicing along the underside of the skin as you peel it back with your other hand. A paper towel can help grip the slippery skin.

Don't worry if it doesn't look perfect; it won't matter once it's smoked.

Fat - Trim the fat as you see fit. I like to trim most of it off, leaving a thin layer.


Aitch Bone (hip bone) - If you purchased a Butt Half or Whole Ham look at the rump end and you should see an oblong bone that looks similar to the bone in a Pork Butt. This is the Aitch (or hip) bone and should be removed,  otherwise injecting and slicing this end of the ham will be difficult.

Locate the bone by feel, then using a sharp boning or filet knife, CAREFULLY cut around the entire back side of the bone plate to expose the ball & socket joint. Then slice all the way around and through the ligament holding it  together. You may need to pull or twist the bone to separate the joint.


Tip: Leave the meat on this bone and DON'T throw it away! Stick it in the brine to cure, then smoke it along side the ham to use it in a pot of beans. Delicious!


Now you're ready to start brining!
« Last Edit: December 20, 2015, 07:48:39 PM by TentHunteR »
<><
2017 MAK 1 Star General with FlameZone
Former Owner: MAK 1 Star General - 2014 & 2011 Models
Weber Performer with Stoven Pellet Grill Adapter
Modified Horizontal Offset Smoker
1986 Weber One-Touch Silver (a few dings, but still works)
Member #68

Offline TentHunteR

  • Global Moderator
  • Hero Member
  • *****
  • Posts: 6687
  • N.E. Ohio
Re: Ham Brining 101
« Reply #3 on: December 19, 2013, 09:22:14 PM »
Section 4: Injecting & Curing the Ham

► Measuring the Brine

To measure out the amount of brine to be injected, you need to know:

1) The ham's weight,
2) The Pump Rate (how much to inject per lb of meat).

If you followed section 2 and made your own brine recipe, then you will already know what your Pump Rate is, otherwise follow the recipe's directions. It will say something like, "Pump to 10% of the ham's weight," or  "...use a 20% pump."
  • If weighing your brine, use this formula:  Ham's Weight  X  Pump Rate = How much Brine to inject
  • If you don't have scales, fortunately 1 liq. oz of brine weighs approximately 1 oz, so...
    use this formula: Ham's Weight  X  Pump Rate X 16 = How many liquid oz to inject
  • or... just follow the table below.


► Injecting
  • You will need a syringe type injector, and a tub to hold the ham and catch brine while you inject.
  • Be sure to inject thoroughly around the bones to prevent bone souring! After that, inject as evenly as possible throughout the rest of the ham.


As a rough guideline:
  • For a 10% pump you will inject about 1/2 oz. every 2 inches or so, flip the ham over and repeat.
  • For a 30% pump you will inject 1/2 oz. about every inch or so...
  • If a little brine seeps out, that's OK. If a lot seeps out, collect and re-inject it.


► Curing the Ham

After injecting, the ham is now ready to be immersed and begin the curing process. During this time the salt & sugar
will equalize throughout the ham, and it will take on its characteristic color, texture and flavor.

Place the ham in it's brining container and add the remainder of the brine making sure the ham is completely submerged.
Use a small heavy plate to weigh it down if necessary.


For larger hams, a brining bag is a good option. Be sure to put it in a container just in case the bag leaks!


Place the covered container is the refrigerator and cure at the following rate:


► Other Uses
Don't forget you can use this method to cure other meats such as:
Bacon, Canadian & Buckboard Bacon or Corned Beef.

« Last Edit: February 17, 2015, 09:37:39 PM by TentHunteR »
<><
2017 MAK 1 Star General with FlameZone
Former Owner: MAK 1 Star General - 2014 & 2011 Models
Weber Performer with Stoven Pellet Grill Adapter
Modified Horizontal Offset Smoker
1986 Weber One-Touch Silver (a few dings, but still works)
Member #68

Offline TentHunteR

  • Global Moderator
  • Hero Member
  • *****
  • Posts: 6687
  • N.E. Ohio
Re: Ham Brining 101
« Reply #4 on: December 19, 2013, 09:22:40 PM »
Section 5: Smoking & Glazing the Ham
Now that the Ham is cured, there's just a couple final steps before it's ready to be smoked.

► Pre-Smoke Prep

Drying & Pellicle Formation
Remove the Ham from the brine, place it a wire rack and discard the brine. NEVER re-use brine!

Pat the ham off with some paper towels and let it air dry near a fan or under the hood of your stove with the fan running until it feels tacky to the touch. The tacky film that forms is a layer of proteins called the pellicle. It allows smoke stick to your ham. There's no minimum time frame for drying; as long as it feels tacky, smoke will stick to it.

Scoring & Seasoning (optional)
Scoring a cross-hatch pattern into the fatty side of the ham can add a nice look and cover up imperfections.

If you season the ham, I think it's best to keep it very simple. Here are a couple of ideas:
  • Rub on a light coating of Fine Ground Black Pepper (no scoring & no glaze) - good flavor & gives an old world look.
  • A sprinkling of course ground Allspice (my favorite) gives that classic "Holiday Ham" taste & smell. It's simple and will work on it's own or with most glazes. I use an inexpensive pepper grinder to grind the allspice berries over the ham.
  • Here's a classic: Score a crosshatch pattern and spike the sections with cloves.
This ham has been scored & seasoned with Allspice.


Ham Netting (optional)
Ham Netting can be used if you prefer to hang your hang. This requires a smoker tall enough for hanging.
Be sure to get netting made for the temperatures you plan to use! Cotton works for cooking & smoking.


► Smoking Methods
And finally... the ham is ready to be smoked! The only thing left is to decide how you're going to smoke it.

Any of these methods will work and trust me, they all yield delicious results.
Which one you choose depends upon how much smoke you want versus time constraints.


Making Cold Smoke
If you don't have a smoker than can produce cold smoke (below 100° F), here are a couple of easy options that will work for almost any grill:

A-MAZE-N Products offers a few different devices designed to give cold smoke using pellets or sawdust.
The A-Maze-N Pellet Tube will provide up to 6 hours of cold smoke using pellets.


Another easy option is to put a dry chunk of wood on top of 4 - 6 lit charcoal briquettes (do NOT soak the wood). This can provide 2 - 3 hours of good clean cold smoke.


► Glazing
Glazing your Ham adds a touch of sweetness and a nice sheen. It's totally optional, but to me the glaze is the Pièce de résistance; that final touch that takes your ham to the "Wow" level!

I like to start glazing when the Ham's internal temp reaches about 140° or so; any sooner and the glaze will most likely burn.  Brush it on every 15 - 30 minutes until the ham reaches 165°.

My two favorite glazes:
  • Brown Sugar & Pineapple juice
  • Maple Syrup.
A few other glaze ideas:
  • Brown Sugar & almost any fruit juice (Orange, Apple, etc.)
  • Brown sugar, allspice & a bit of water.
  • Cola, simmered & reduced.
  • Honey thinned with just a little water.
  • Maple & Brown sugar
  • Maple Syrup or honey with just a touch of a cayenne  - Killer!)
  • Brown Sugar & Bourbon or Rum.
Mix your glaze ingredients in a small pan & simmer, stirring until it's a syrup-like consistency.


► Finish Temp
Once your ham has reached an I.T. of 165°, the ham is finished cooking and can be pulled from the smoker/oven and allowed to rest before slicing.


► The Hardest Part - Resting the Ham!
The smell of your ham wafting through your house is going to make you and your guests hungry. LET IT!!! After all your work, don't mess up now by slicing it too soon; let it rest for at least 30 - 45 minutes! This allows time for the fibers to relax so the ham is tender and stays juicy when you slice it.


Enjoy your ham and all the accolades that go along with it. I promise, once you cure & smoke your own ham, you'll never want to buy a mass-produced-store-bought ham again!

Thanks, and I hope you find this useful!

Cliff


« Last Edit: April 04, 2015, 11:12:38 AM by TentHunteR »
<><
2017 MAK 1 Star General with FlameZone
Former Owner: MAK 1 Star General - 2014 & 2011 Models
Weber Performer with Stoven Pellet Grill Adapter
Modified Horizontal Offset Smoker
1986 Weber One-Touch Silver (a few dings, but still works)
Member #68

Offline TentHunteR

  • Global Moderator
  • Hero Member
  • *****
  • Posts: 6687
  • N.E. Ohio
Re: Ham Brining 101
« Reply #5 on: December 20, 2013, 08:48:00 AM »
Reserved for updates.
<><
2017 MAK 1 Star General with FlameZone
Former Owner: MAK 1 Star General - 2014 & 2011 Models
Weber Performer with Stoven Pellet Grill Adapter
Modified Horizontal Offset Smoker
1986 Weber One-Touch Silver (a few dings, but still works)
Member #68

Offline Sailor1

  • Hero Member
  • *****
  • Posts: 525
Re: Ham Brining 101
« Reply #6 on: December 20, 2013, 09:18:09 AM »
Cliff, That is a fantastic write up.  Never tried to do a ham but now you have me really wanting to do this.  Thank you for taking the time to write this up!

Jim


Enough ain't enough and too much is just about right.

Offline Pappymn

  • Hero Member
  • *****
  • Posts: 12342
Ham Brining 101
« Reply #7 on: December 20, 2013, 09:23:54 AM »
Bookmarked for future reference. Thanks
Pappy

Proud Owner of Mak 2 Star General #1,000
Weber Performer
Blackstone SS Griddle
Member #109

Offline muebe

  • Hero Member
  • *****
  • Posts: 14918
  • Santa Clarita,Ca
Re: Ham Brining 101
« Reply #8 on: December 20, 2013, 09:29:24 AM »
Outstanding guide!
Member #22
2 TBEs(1 natural gas & 1 LP gas)
OBS(Auberins dual probe PID, 900w finned element & convection fan mods)
2011 Memphis Select Pellet Smoker
Traeger PTG with PID
PBC
BBQ Grillware vertical smoker(oven thermostat installed & converted to natural gas)
Uuni 2 Wood Fired Pizza Oven

Offline sliding_billy

  • Hero Member
  • *****
  • Posts: 10565
  • North Texas
Re: Ham Brining 101
« Reply #9 on: December 20, 2013, 09:33:53 AM »
Thanks for the very well written guide!
Custom Offset/GMG Davy Crockett/Vision Kamado/Blackstone 36"/Weber 22" "redhead"/ WSM 14.5" X2/Jumbo Joe/Pit Boss Copperhead/KCBS

Offline ACW3

  • Hero Member
  • *****
  • Posts: 8397
  • Morganton, NC
Re: Ham Brining 101
« Reply #10 on: December 20, 2013, 10:00:04 AM »
Cliff,
Great job, my friend.  This is a great resource to have available.

Art
MAK 2 STAR (#171) Since RETIRED!
MAK 2 STAR (#4408)
Weber Kettle W/ Rotisserie
Uuni 2 Pizza Oven
Member #11

Offline Ka Honu

  • Hero Member
  • *****
  • Posts: 2336
Re: Ham Brining 101
« Reply #11 on: December 20, 2013, 10:33:40 AM »
What they said plus a big Mahalo.
Everyone is entitled to my opinion

Offline squirtthecat

  • Hero Member
  • *****
  • Posts: 1977
  • Springfield-ish, IL
Re: Ham Brining 101
« Reply #12 on: December 20, 2013, 10:45:16 AM »

Awesome!

Offline sparky

  • Hero Member
  • *****
  • Posts: 8353
  • northern california
Re: Ham Brining 101
« Reply #13 on: December 20, 2013, 11:58:25 AM »
that was very cool TH.   8)
PBC
Cobb Grill
Go Sun Solar Cooker
Weber Jumbo Joe
Weber Mastertouch
member #66